Machine Learning Deployment - A Product Recommendation Engine Deployed and Tracked with a Local Machine Learning - Workbench
Posted on Tue 15 February 2022 in Machine Learning Deployment & Tracking
Train & Serve a Machine Learning Model as a Microservice using Docker and Track the Model-Performance using MLflow
Let's build a recommendation engine with a collaborative filtering model, track the model results with MLflow and use Flask to serve batch-predictions of related products other users may like as well
Background
One of the biggest challenges with data science & machine learning is that compared to most software engineering workflows, development and deployment requires a lot more data, tooling, and experimentation. Not coming from a software engineering background many Data Scientists lack experience in producing production ready software systems. One way to overcome this issue is to improve local development experiences for data science and machine learning tasks. Precisely, working and developing in a local setup that looks like a cloud-based workflow can help Data Scientists to move their work more easily into production systems.
TL;DR What we will do
In the first part, we will explore the creation of a local machine learning workbench aka containerized docker setup for production software-like development workflows. Having that in mind, we will use the following tools to do so:
- MLFlow for experiment tracking and model management
- MinIO to mimic AWS S3 and act as an artifact and data storage system
- PostgreSQL for a SQL engine and to serve as a backend store for MLFlow
We will end up with an easily and quickly configurable docker setup that gets all these tools up and running. Our goal is not to make this fully runnable in the cloud (yet). We want a working setup that we can start with one command to be able to experiment working with all kinds of different data and models.
In the second part, we will train and track a collaborative filtering model and use the following tools for training & serving predictions of related products other users may like as well with a RESTful API:
- implicit to train our model
- Flask REST API to serve our predictions
So let's start and walk through the above tools and discuss their purposes. The code for this example can be found on Github.
1. Machine Learning Workbench
1.1 Containerization with Docker

Docker helps us to containerize our code and further deploy our applications in a clean and sustainable way. The open source containerization platform enables to package applications combining source code with the operating system libraries and dependencies required to run that code in any environment.
Containerization comes handy in many different situations like
- Separating the logic
- Handling of multiple services
- Scheduling of services
- Deployment in any environment
So if one is tasked with deploying a machine-learning model that should regularly make predictions, consider doing that with the help of Docker.
You may find a more complete introducton to Docker and its benefits here. For now just think of it as a container, literally of e.g. a shipping-container, that helps to separate your code and make it independently executable.
Creating the Docker Images
A Dockerfile is essentially the configuration file used by Docker. It allows us to define the contents and configure the operations of a Docker container, when made operational (meaning our code is executed).
When not made operational as a container it is referred to as an image.
In our project root directory one can find the relevant Dockerfiles for the various services in the /build folder.
For reference, the Dockerfile for our MLlfow image which can be found in build/mlflow is shown below:
FROM conda/miniconda3:latest

RUN mkdir -p /mlflow/mlruns

WORKDIR /mlflow

ENV LC_ALL=C.UTF-8
ENV LANG=C.UTF-8

RUN echo "export LC_ALL=$LC_ALL" >> /etc/profile.d/locale.sh
RUN echo "export LANG=$LANG" >> /etc/profile.d/locale.sh
ENV GUNICORN_CMD_ARGS="--timeout 500"

RUN apt-get update && apt-get install -y \
    build-essential \
    python3-dev \
    libpq-dev

RUN pip install -U pip && \
    # pip install --ignore-installed google-cloud-storage && \
    pip install boto3 psycopg2 mlflow==1.9.1 && \
    pip install gunicorn==19.9.0

COPY ./build/mlflow/start.sh ./start.sh
RUN chmod +x ./start.sh
As you can see there exists a start.sh file in the same folder which is used later as an entrypoint in docker-compose.yml when the container is started. This shell script links to our database backend store postgresql and to our as artifact root s3 described in the following.
mlflow server \
    --backend-store-uri $DB_URI \
    --host 0.0.0.0 \
    --port 5000 \
    --default-artifact-root s3://mlflow/
Our Multi-Container Architecture
Docker Compose is a tool for running multi-container applications on Docker. In the following let us walk through the individual services making up our ML-Workbench and explore what they do.
MLflow - Tracking The Machine Learning Lifecycle
Machine Learning is a piece of complex software, and being aware of its performance is key in creating high quality data products. We need to know how changes to the model and data affect the performance. Unfortunately, evaluating the performance during development only is not enough. In production settings multiple unwanted things could happen like e.g. model drift, etc. In a best case scenario the results consistently improve, but unfortunately that can not be taken for granted. That is the reason why tracking and monitoring is the way to go about things in productionizing machine learning models. We can do all that with the help of MLflow.
MLflow is an open source platform to manage the ML lifecycle, including experimentation, reproducibility and deployment. — https://mlflow.org/
MLflow currently provides four components to help manage the ML workflow, including:
-
MLflow Models: are a standard format for packaging machine learning models that can be used in a variety of downstream tools - e.g., serving through a REST API. The format defines a convention that lets you save a model in different “flavors” that can be understood by different downstream tools.
-
MLflow Projects: devoted to automatically creating a self-contained environment that includes code, data, libraries (dependencies) and configurations, ready to be shared with other Data Science team members. It makes a step towards the reproducibility and reusability of data science code.
-
The MLflow Model Registry component is a centralized model store, set of APIs, and UI, to collaboratively manage the full lifecycle of an MLflow Model. It provides model lineage (which MLflow experiment and run produced the model), model versioning, stage transitions (for example from staging to production), and annotations.
-
MLflow Tracking: : is an API and UI for tracking and logging parameters, code versions, metrics, hyperparameters, and artifacts when training your machine learning model.. This way, one later query, review and compare them, always having the results linked with the parameter configuration that generated the result.
We won't go into detail about all the basics and fundamentals of MLflow here, but instead we walk through how to set up MLflow in our local workbench as efficiently as possible. In the second part of this article we explore how to log our model, various hyperparameters and metrics during training.
Although, one would also be able to track model parameters and metrics locally only, the recommended approach is to create a MLflow tracking server that allows us to use some backing technologies. Setting up the server will provide one with a GUI where one is able to manage model runs and experiments and see logged metrics and artifacts.
Let's set up our MLflow-Server service mlflow-server in our docker-compose.yml file:
  mlflow-server:
    container_name: ${COMPOSE_PROJECT_NAME}-mlflow-server
    build:
      context: ./
      dockerfile: ./build/mlflow/Dockerfile
    networks:
      - backend
    ports:
      - "$MLFLOW_PORT:5000"
    environment:
      DB_URI: postgresql+psycopg2://${POSTGRES_USER}:${POSTGRES_PASSWORD}@postgresql:${POSTGRES_PORT}/${POSTGRES_DATABASE}
      AWS_ACCESS_KEY_ID: "${MINIO_ACCESS_KEY}"
      AWS_SECRET_ACCESS_KEY: "${MINIO_SECRET_ACCESS_KEY}"
      MLFLOW_S3_ENDPOINT_URL: "http://s3:${MINIO_PORT}"
    restart: always
    depends_on:
        - waitfordb
    entrypoint: ./start.sh
with the following environmental variables declared in our .env file:
# Environment
COMPOSE_PROJECT_NAME=recommender
ENVIRONMENT=local

# MLflow configuration
MLFLOW_PORT=5000
MLFLOW_BUCKET_NAME=mlflow

# Postgres configuration
POSTGRES_USER=mlflow
POSTGRES_PASSWORD=mlflow
POSTGRES_DATABASE=mlflow
POSTGRES_PORT=5432

# Minio configuration
MINIO_ACCESS_KEY=minio
MINIO_SECRET_ACCESS_KEY=minio123
MINIO_PORT=9000
We need these environment variables as we connect our MLFLow Server to a PostgreSQL & Minio Server in the next steps.
PostgreSQL - Backend store
When running a MLflow server you can specify a backend store, this store is any SQLAlchemy compatible database that will be responsible for logging anything that is not an artifact like model experiments, hyper-parameters or model validation metrics. Concretely this means that only the large files, like e.g. models will be left out of the backend store.
The service postgresql is added to docker-compose.yml as follows:
  postgresql:
    container_name: ${COMPOSE_PROJECT_NAME}-postgresql
    restart: always
    image: postgres:11
    ports:
      - "${POSTGRES_PORT}:5432"
    networks:
      - backend
    environment:
      - POSTGRES_USER=${POSTGRES_USER}
      - POSTGRES_PASSWORD=${POSTGRES_PASSWORD}
      - POSTGRES_DB=${POSTGRES_DATABASE}
    volumes:
      - db_data:/var/lib/postgresql/data/

  waitfordb:
        image: dadarek/wait-for-dependencies
        depends_on:
            - postgresql
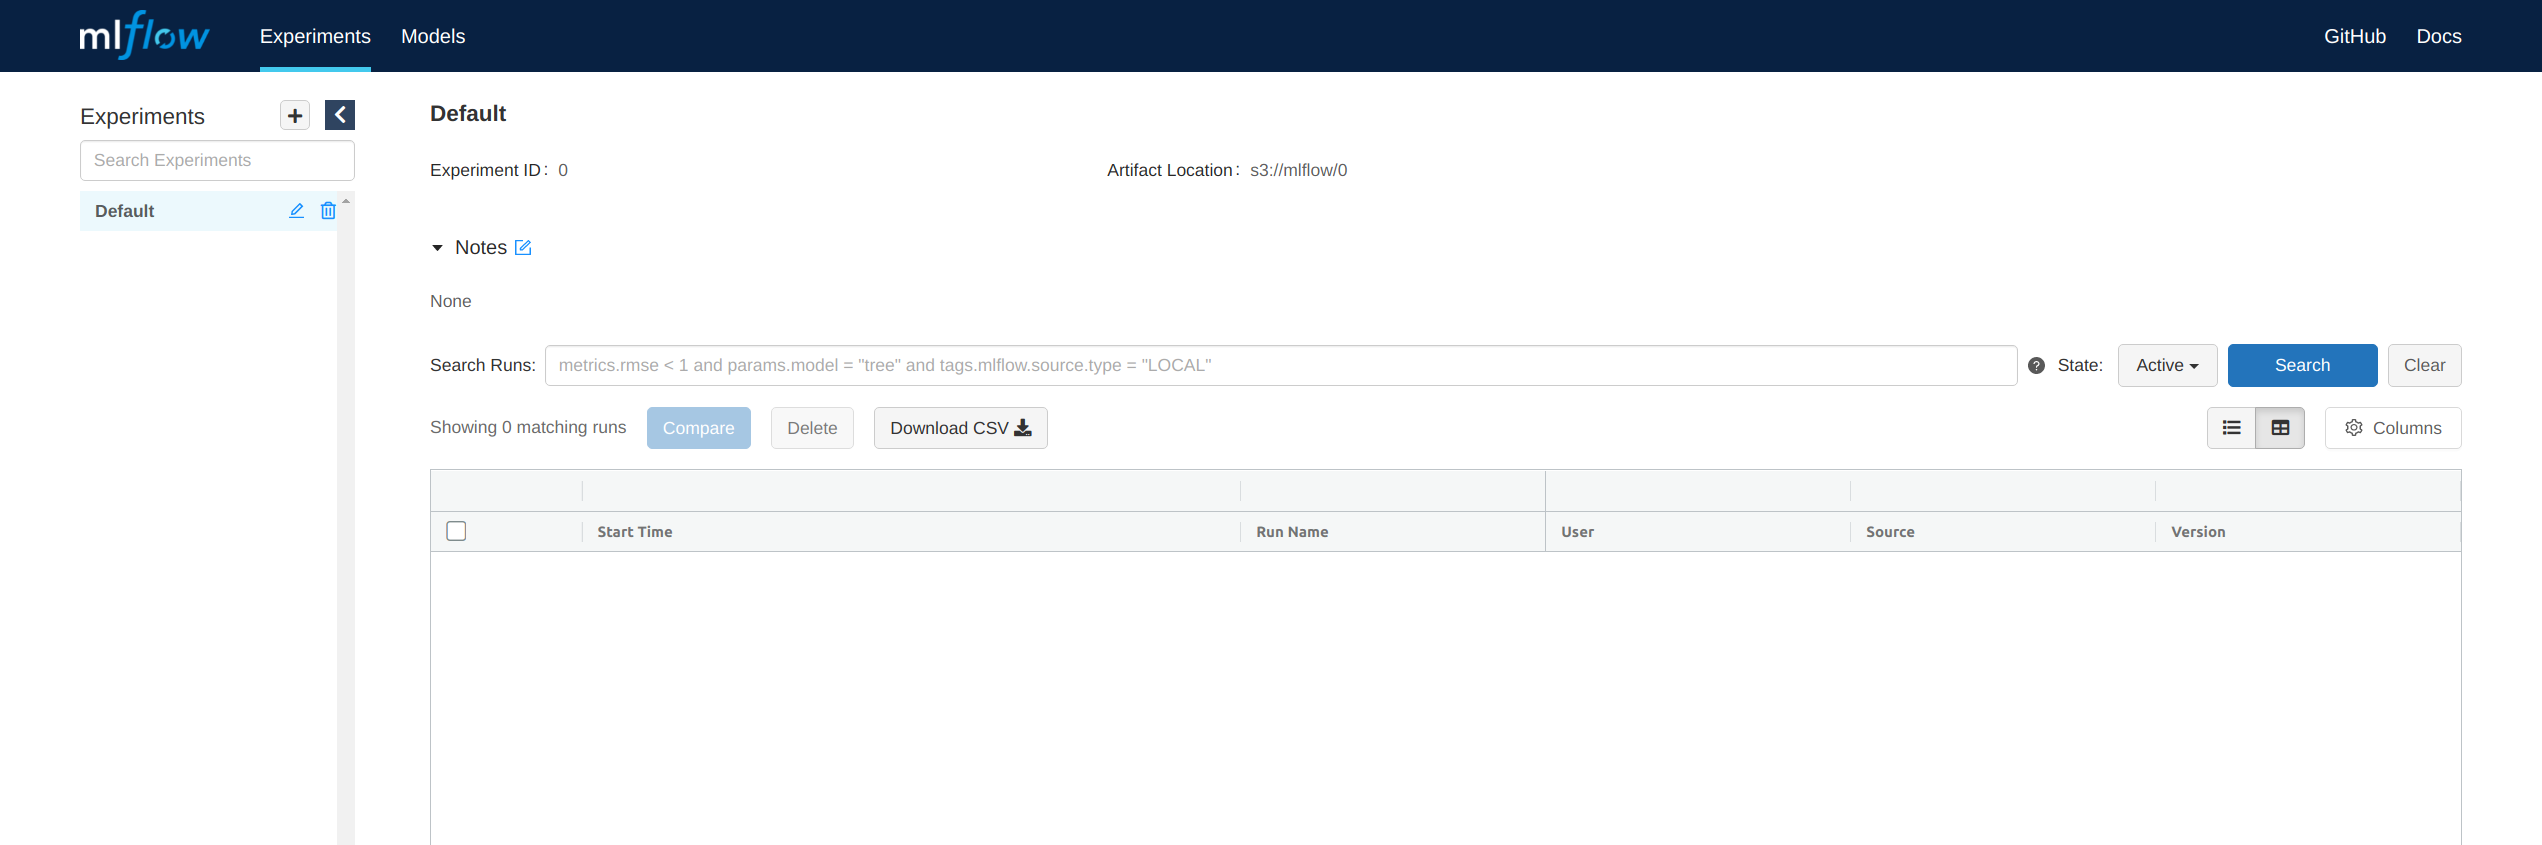
We can check out the MLflow GUI on localhost:5000:
MinIO - Artifact Store
Same as the PostgreSQL backend store, it is another storage place for the MLflow tracking server. The purpose of the artifact store is to persist large files. Some examples of artifacts could be: a model, plots of metrices, etc. The nice thing is that more or less any file can be stored as an artifact. In production settings one will probably specify a cloud bucket. As we don't want our local environment to be connected to the cloud we will use a MinIO server as service s3 where we create a bucket via create_buckets. We will later show in the second part how to log our model. For now let's just add the service:
  s3:
    container_name: ${COMPOSE_PROJECT_NAME}-minio
    image: minio/minio:RELEASE.2021-11-24T23-19-33Z
    restart: unless-stopped
    ports:
      - "9000:9000" # port to interact with minio server
      - "9001:9001" # port to login to minio dashboard
    networks:
      - frontend
      - backend
    environment:
      MINIO_ACCESS_KEY: ${MINIO_ACCESS_KEY}
      MINIO_SECRET_KEY: ${MINIO_SECRET_ACCESS_KEY}
    # Allow all incoming hosts to access the server by using 0.0.0.0
    command: server --console-address ':9001' --address ':9000' /data
    volumes:
      - ./minio_data:/data

  create_buckets:
     image: minio/mc:RELEASE.2019-07-17T22-13-42Z
     depends_on:
       - s3
     networks:
       - backend
     entrypoint: >
       /bin/sh -c '
       sleep 5;
       /usr/bin/mc config host add s3 http://s3:${MINIO_PORT} ${MINIO_ACCESS_KEY} ${MINIO_SECRET_ACCESS_KEY} --api S3v4;
       [[ ! -z "`/usr/bin/mc ls s3 | grep challenge`" ]] || /usr/bin/mc mb s3/${MLFLOW_BUCKET_NAME};
       /usr/bin/mc policy download s3/${MLFLOW_BUCKET_NAME};
       exit 0;
       '
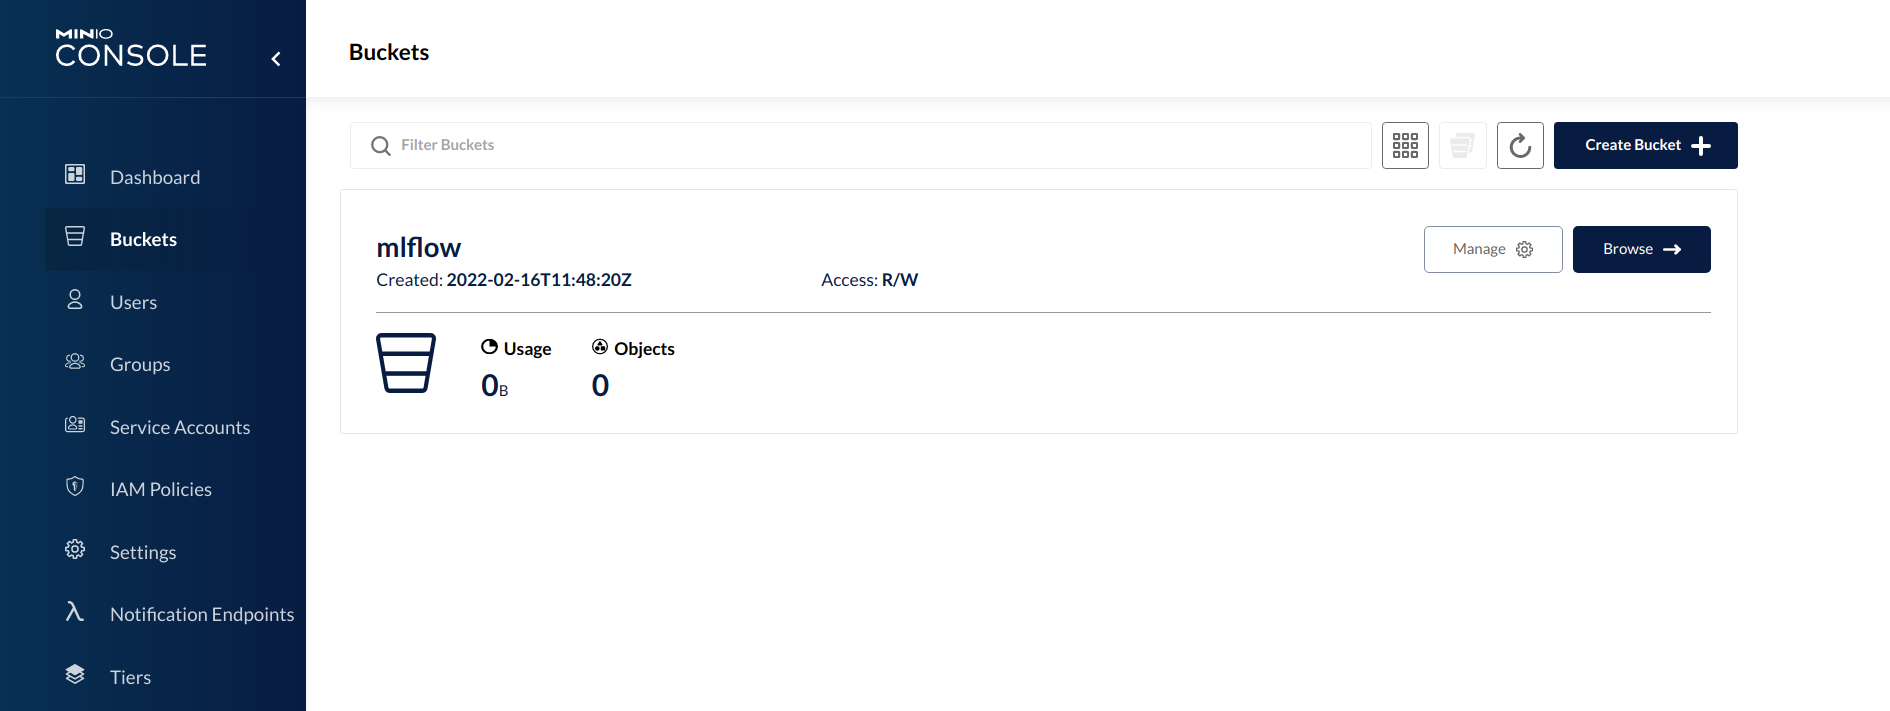
Now, let's check if the MinIO server and bucket is running by checking the MinIO console on localhost:9001/ in the browser.
2. Machine Learning Model - Recommendations with Collaborative Filtering
Recommendation Engines count as one of the highly successful ML-Applications in the applied world of Data Science & ML. We will use Benfred's great implicit model, a simple implementation of Collaborative Filtering with ALS, as it is computational inexpensive using Cython and proofed as real world ready with great results.
Matrix factorization
The idea is basically to take a large user-item matrix and factor it into some smaller representation of the original matrix. You can think of it in the same way as we would take a large number and factor it into two much smaller primes. We end up with two or more lower dimensional matrices whose product should equal the original one. This let's us estimate how much a user should like an item/product he or she originally didn't interact with based on the preferences of lots of other users.
2.1 Data
As stated above Collaborative Filtering makes use of interactions of users with products. As input these interactions need to be provided in a so called user-item interaction matrix. To create this matrix we need some data. We use some synthetic data consisting of a product catalog product_catalog.csv and raw user interaction data journey.csv, created from real website data. It can be accessed here and needs to be copied into 0_Data. We store the data in the mounted volume 0_Data for testing purposes. In a more production like environment, one will usually get the data from a database or datawarehouse. We later use a class PreProcess() to transform our data to be in right shape for our modeling purposes.
2.2 Services for Model Training & Serving Batch Predictions
Additionally to the services making up or workbench in the first section, let's now add some more services to train our model and be able to serve the predictions later.
  train:
    container_name: ${COMPOSE_PROJECT_NAME}-train
    build:
      context: ./
      dockerfile: ./build/train/Dockerfile
    networks:
      - backend
    depends_on:
      - mlflow-server
      - postgresql
    restart: "no"
    volumes:
      - ./0_Data:/src/0_Data
    command: >
      bash -c "tail -f /dev/null"
    environment:
       DOCKER_NAME: ${COMPOSE_PROJECT_NAME}-train
       ENVIRONMENT: ${ENVIRONMENT}
       PROJECT_PATH: "/src"
       TZ: "Europe/Vienna"
       PYTHONUNBUFFERED: 1
       MODEL_DIR: ./2_Trained_Models
       OPENBLAS_NUM_THREADS: 1
       AWS_ACCESS_KEY_ID: ${MINIO_ACCESS_KEY}
       AWS_SECRET_ACCESS_KEY: ${MINIO_SECRET_ACCESS_KEY}
       MLFLOW_S3_ENDPOINT_URL: http://s3:${MINIO_PORT}

  api_batch:
    container_name: ${COMPOSE_PROJECT_NAME}-api_batch
    build:
      context: ./
      dockerfile: ./build/serve_batch/Dockerfile
    networks:
      - backend
    restart: "always"
    expose:
          - "5001"
    ports:
      - 5001:5001
    volumes:
      - ./0_Data:/src/0_Data
    environment:
      DOCKER_NAME: ${COMPOSE_PROJECT_NAME}-api_batch
      ENVIRONMENT: ${ENVIRONMENT}
      PROJECT_PATH: "/src"

  cron:
    container_name: ${COMPOSE_PROJECT_NAME}-cron
    image: mcuadros/ofelia:latest
    networks:
      - backend
    restart: always
    volumes:
      - /var/run/docker.sock:/var/run/docker.sock:ro
      - /usr/share/zoneinfo/:/usr/share/zoneinfo/
      - ./config/cron/config.ini:/etc/ofelia/config.ini
    environment:
      TZ: "Europe/Vienna"
      DOCKER_NAME: ${COMPOSE_PROJECT_NAME}-${ENVIRONMENT}-cron

  nginx:
    build:
      context: ./
      dockerfile: ./build/nginx/Dockerfile
    networks:
      - backend
    expose:
      - "8080"
    ports:
      - "80:8080"
    depends_on:
        - api_batch
Let's briefly explore what these individual services do:
train- loading and preprocessing the data and training of our collaborative filtering modelapi_batch- serving our batch-predictions via a Rest-APIcron- scheduling the execution of all the other servicesngnix- a webserver in front of our Flask API
To build all the individual images run
$ docker-compose build
To then start all the services in detached mode run
$ docker-compose up -d
All the services should now be up and running. One can check that with
$ docker container ps
Next, let's dive a bit deeper into the individual services and their purpose and logic in the next sections.
2.2.1 Model Training & Tracking plus Logging of Metrics and Parameters
We aim to find the our best model via hyperparameter optimization with random search training.random_search_implicit() in train.py. As validation metric we choose the Mean Average Precision at K (MAPat5).
# Import Class TrainImplicit
from modeltraining import TrainImplicit

# Instantiate Object
training = TrainImplicit(sparse_item_user)

# Find best model and get hyperparameters
best_hyperparams = training.random_search_implicit(num_samples=100)

# Fit Model with best hyperparameters
trained_model = training.train_best(best_hyperparams)
One could use implicit's built-in method model.similar_items(itemid) to predict related products on the fly, but for simplicity & performance purposes let's decide on creating batch predictions stored as a json-file for now.
with mlflow.start_run(run_name=f"recommender_{current_date}"):

  #
  #
  #
  #

  from predictions import BatchPredictions

  # Instantiate Object
  pred = BatchPredictions(sparse_item_user,df_products,trained_model)

  # Batch Predictions
  related_items = pred.product_batch_predictions_implicit()

  # Store related_items.json in 0_Data
  with open("0_Data/related_items.json", 'w') as outfile:
    json.dump(related_items, outfile, indent = 4, sort_keys = False)
    print("related_implicit.json stored in 0_Data")

  # Log related_items.json as artifact
  mlflow.log_dict(related_items, "data/related_items.json")

  # Log Hyperparameters & MAP@5
  mlflow.log_metric("MAPat5", best_hyperparams["map5"])
  mlflow.log_param("alpha", best_hyperparams["alpha"])
  mlflow.log_param("factors", best_hyperparams["factors"])
  mlflow.log_param("regularization", best_hyperparams["regularization"])
  mlflow.log_param("iterations", best_hyperparams["iterations"])
  mlflow.log_param("Date", current_date)
For local testing purposes we can schedule our train.py script in the train container with cronjob defined in config/cron/config.ini for now:
[job-exec "train"]
schedule = 0 10 14 * * *
container = recommender-train
command = /bin/bash -c 'pipenv run python3 /1_Train_Models/train.py'
Another possibility would be to e.g. implement Airflowor or Luigi. You can find more information on various workflow scheduling tools here.
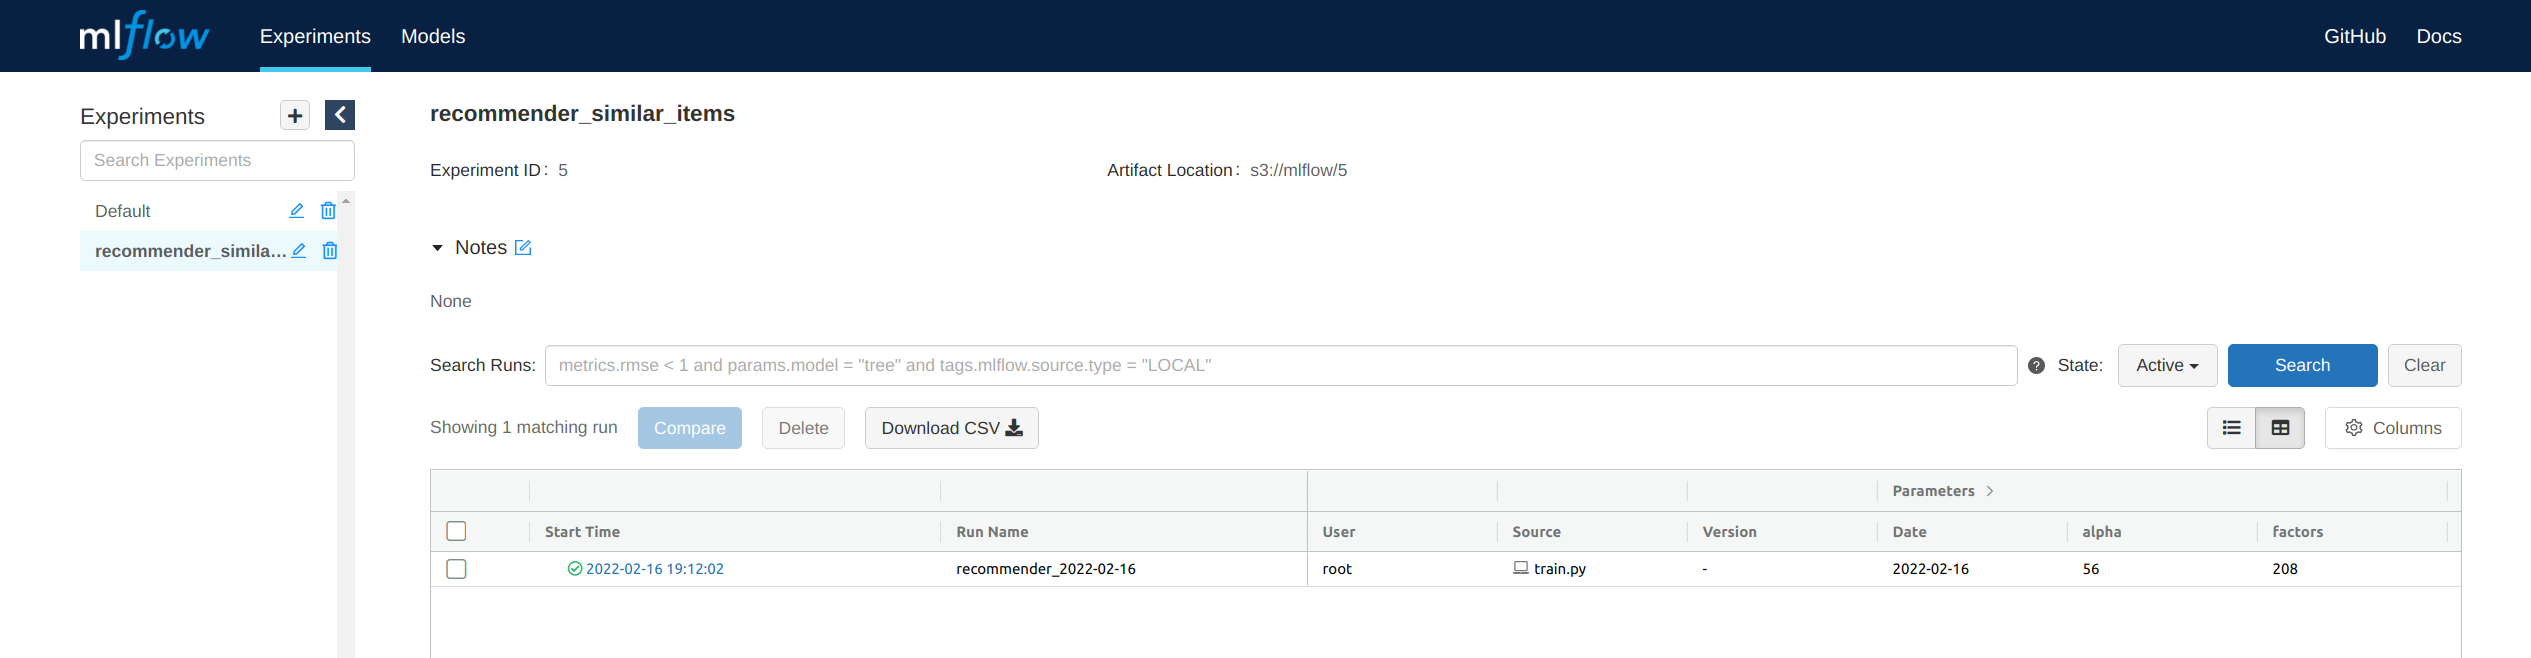
With the help of MLflow Tracking one can log related_items.json with mlflow.log_dict(). Additionally, we log our best mean average precision at K (MAPat5) with mlflow.log_metric() and the corresponding hyper-parameters with mlflow.log_param(). We are then able to see the various logs of our experiment in the MLflow GUI:
2.2.2 Model Logging
Next, let's explore how to log our model after training.
Beyond Built-in Model Flavors - Creating Custom Pyfunc Models
MLflow flavors
MLflow flavors are the key concept that makes MLflow Models powerful. In order for a model to be easily logged with MLflow or to make it deployable there must exist an MLflow flavor which determines how the model created by a concrete ML framework should be saved to disk, loaded into memory again, and queried to get predictions. So one can say a ML flavor is a convention that deployment tools can use to understand the model.
By default, MLfow provides several built-in flavors that can be directly used with specific models and frameworks, e.g. PyTorch, XGBoost, CatBoost, Prophet, etc. That means, e.g. a Prophet models in MLflow format can be easily saved via mlflow.prophet.save_model(), logged with mlflow.prophet.log_model(), and loaded via mlflow.prophet.load_model().
However, MLflow's built-in flavors do not support every model. A readymade solution to apply the above methods to our implicit model does not exist. Fortunately, when a ML framework is not directly supported by MLflow, there still exists an option to implement some customization using MLflow's python_function (pyfunc) module. MLflow supports a generic filesystem model format for Python models and provides utilities for saving, logging and loading models to and from this pyfunc format. The pyfunc model flavor is self-contained in the sense that it includes all the information necessary to load and use a model. Dependencies are stored either directly with the model or can be attached as a Conda environment.
Custom Python Models
The mlflow.pyfunc module provides the methods save_model() and log_model() for creating MLflow Models with the python_function flavor that contains user-specified code and artifact dependencies. These artifact dependencies may include serialized models produced by any Python ML library.
Construct a model wrapper compatible with pyfunc
Given a set of artifact URIs, save_model() and log_model() can automatically download artifacts from their URIs and create an MLflow model directory.
So how can we then log and save our implict model with this flavor now? We have to implement a few methods that are common to any flavor already supported by MLflow. In our case, we can define a wrapper Python class ImplicitWrapper that conforms to MLflow's "Python function" flavor and inherits from Mlflows pyfunc.PythonModel, defining predict() and, optionally, load_context().
We define a wrapper class ImplicitWrapper around our implicit model that conforms to MLflow's pyfunc flavor. Then, we can later use this class to log our model.
import implicit
import mlflow.pyfunc


class ImplicitWrapper(mlflow.pyfunc.PythonModel):
    """
    Class to train and use Implicit Models
    """

    def load_context(self, context):
        """This method is called when loading an MLflow model with pyfunc.load_model(), as soon as the Python Model is constructed.
        Args:
            context: MLflow context where the model artifact is stored.
        """
        import implicit
        import joblib

        self.model = joblib.load(context.artifacts["implicit_model_path"])


    def predict(self, context, model_input):
        """This is an abstract function. We customized it into a method to fetch the implicit model.
        Args:
            context ([type]): ML-Flow context where the model artifact is stored.
            model_input ([type]): the input data to fit into the model.
        Returns:
            [type]: the loaded model artifact.
        """
        return self.model
Be aware that the above defined predict function is not a real prediction function. We only use it to return the saved model. This can be improved by implementing a real prediction function that takes model input and returns prediction results - let's keept that for one of our next articles.
Within mlflow.start_run we can then save & log our custom model:
with mlflow.start_run(run_name=f"recommender_{current_date}"):

  .
  .
  .

  tracking_url_type_store = urlparse(mlflow.get_tracking_uri()).scheme
  print(tracking_url_type_store)

  from implicitwrapper import ImplicitWrapper

  # Create an 'artifacts' dictionary that assigns a unique name to the saved implicit model file.
  # This dictionary will be passed to 'mlflow.pyfunc.save_model', which will copy the model file
  # into the new MLflow Model's directory.


  # Model name & path
  model_name = "implicit_model"
  implicit_model_path = model_name + ".joblib"

  # Store implicit model as joblib file
  joblib.dump(trained_model, implicit_model_path, compress=True)
  print('Implicit Model saved')

  artifacts = {
      "implicit_model": implicit_model_path
  }

  mlflow_pyfunc_model_path = model_name

  # Model registry does not work with file store
  if tracking_url_type_store != "file":
      mlflow.pyfunc.log_model("model",
          registered_model_name="implicit_model",
                                python_model=ImplicitWrapper(),
                                artifacts=artifacts)
  else:
      mlflow.pyfunc.log_model("model",
                              path=mlflow_pyfunc_model_path,
                              python_model=ImplicitWrapper(),
                              artifacts=artifacts)
We used mlflow.pyfunc.log_model() to save the implicit trained model in a way to be understood by MLflow:
artifact_path- The run-relative artifact path where the model should be to logged.python_model- A generic Python model - we refer to our ImplicitWrapper defined above.code_path- A list of local filesystem paths to Python file dependencies (or directories containing file dependencies).artifacts- A python dictionary containingPythonModel.load_context()andPythonModel.predict().
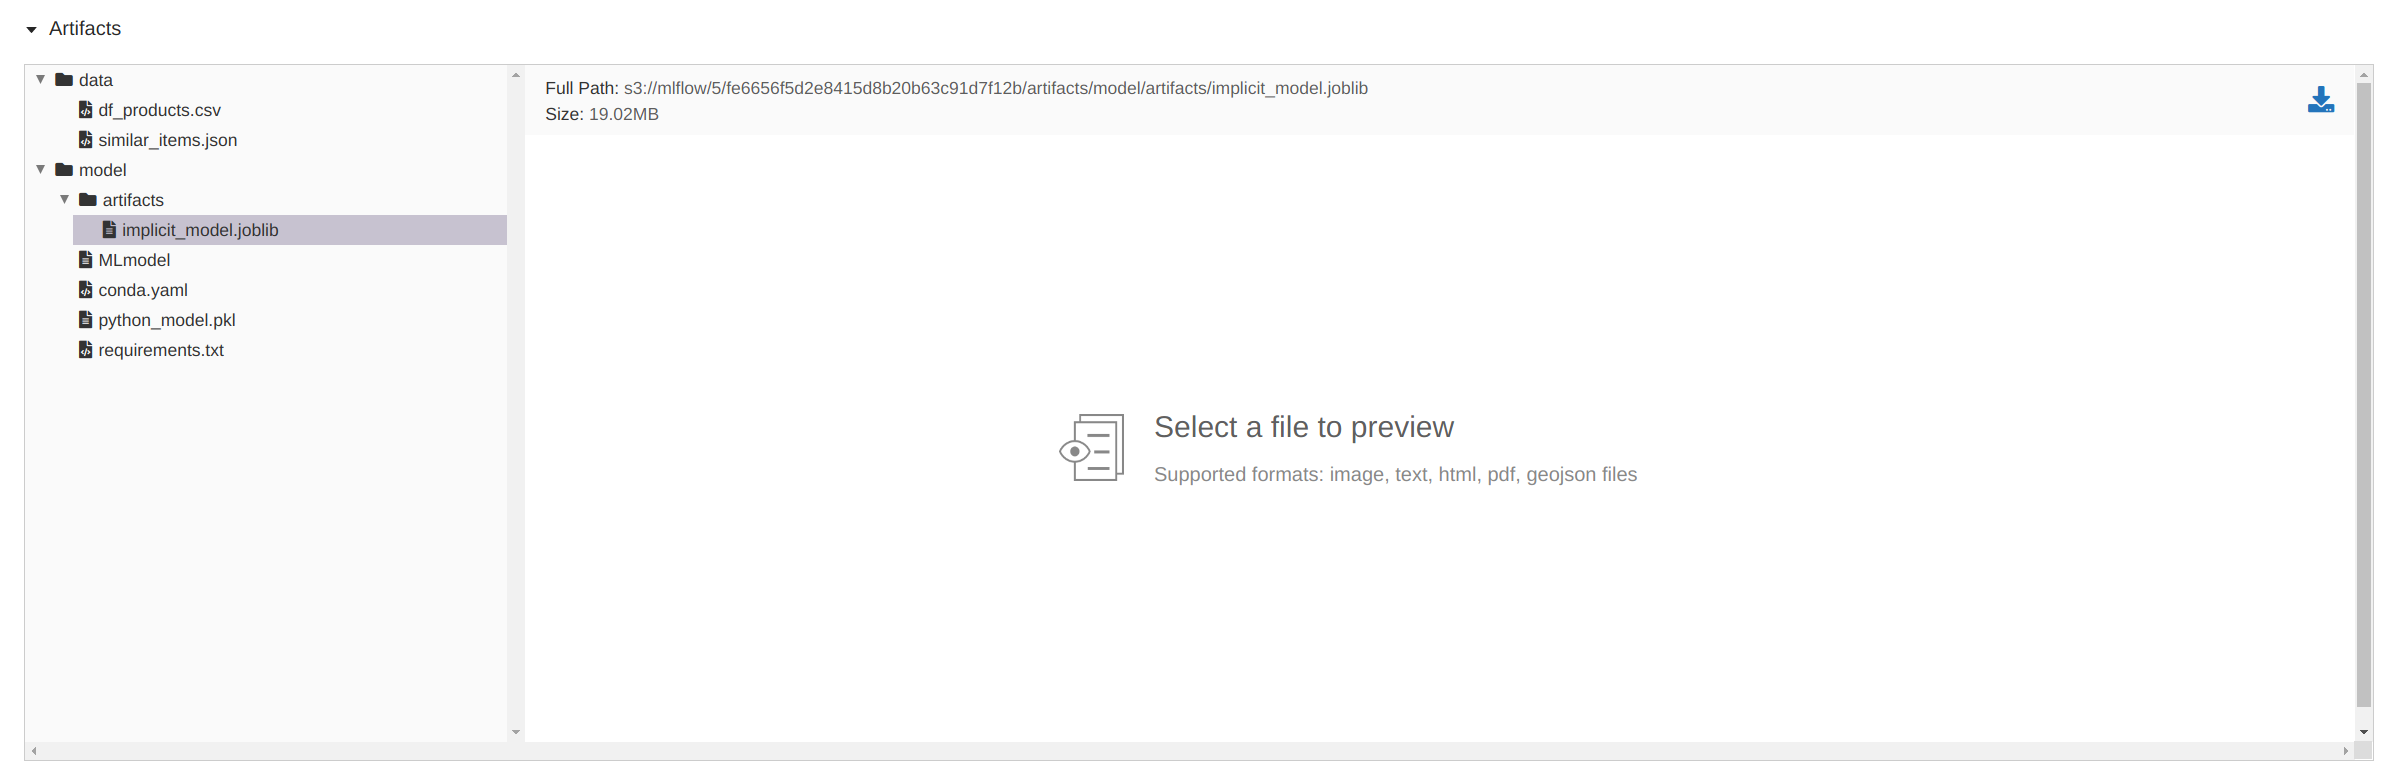
Et voilà - We can now find our logged model in the MLflow GUI:
2.3 Building a Flask RESTful API
Flask is a widely used micro web framework for creating APIs in Python. It is a simple yet powerful web framework which is designed to get started quickly. We will use it to create a REST API to serve our batch recommendations of products other users should have liked as well. A quick recap - what is a REST API? A REST API (also known as RESTful API) is an application programming interface (API or web API) that allows for interaction between web services.
Here is the Dockerfile for our Flask API which can be found in build/serve_batch:
FROM python:3.8-slim

# ENVIRONMENT

ENV SERVICE_NAME=recommender
ENV API_VERSION = 1

WORKDIR /src

# Both files are explicitly required
COPY ./2_Serve_Batch_Inference/Pipfile  ./
COPY ./2_Serve_Batch_Inference/Pipfile.lock ./

RUN pip install pipenv
RUN apt-get update && \
    apt-get -y install gcc g++ python3-dev

RUN mkdir .venv
RUN pipenv install

RUN mkdir 0_Data

COPY ./2_Serve_Batch_Inference/. .

EXPOSE 5001
CMD ["pipenv", "run", "gunicorn", "--bind", "0.0.0.0:5001", "--workers=2", "--access-logfile=-", "api:app"]
Let us briefly walk through the content of the above Dockerfile:
- use a pre-configured Docker image of
python:3.8-slimthat has a version of the Alpine Linux distribution and Python already installed - then copy the contents of the directory where the dockerfile is executed from to a directory to our image working directory
/src - then we install the Pipenv package for Python dependency management
- then use Pipenv to install the dependencies described in Pipfile.lock into a virtual environment on the image
- exposed port 5001 to the world outside of the container
- finally, we start our app offering our Flask RESTful web service. Nginx will handle the requests to our API via Gunicorn.
Although Flask has a built-in web server, it's not suitable for production and needs to be put behind a real web server able to communicate with Flask through a WSGI protocol. For demonstration purposes Gunicorn is used here. Gunicorn is a necessary component for getting Flask into production. Flask (and Python in general) needs a Web Server Gateway Interface (WSGI) to handle all connections with a web server like Nginx. Flask has a built in WSGI, but it is not secure or efficient and should NOT be used for production. For more info you can check out this nice book
Now let's see how our api_batch service looks like:
The Flask framework is used for creating a web service (app) that executes in response to a HTTP request/post to a specific url (called route here). The relevant code of api.py is shown below
"""
api.py
~~~~~~
Defines a simple REST API with Flask for Batch-Inference
"""

from flask import Flask, request # abort, jsonify, make_response
import os
import warnings
import json
# Ignore warnings
warnings.filterwarnings('ignore')

# Environment
service_name = os.environ['SERVICE_NAME']
version = os.environ['API_VERSION']

# Flask-API
app = Flask(__name__)

# Load related items
with open("./0_Data/related_items.json", 'r') as file:
    implicit_related = json.load(file)
    print("related_items.json loaded")

@app.route('/related_others_liked', methods=['GET','POST'])
def related_others_liked():
    """Other users liked aswell - related products from implicit"""
    try:

        data = request.get_json(force=True)
        print("Request received")

        # Extract Product-Sku
        sku = data['sku']

        # Get 10 related items
        rel_imp = json.dumps(implicit_related[sku], indent=4)

        print(rel_imp)

        # Return rel tems from Implicit
        return(rel_imp)


    except ValueError:
        raise RuntimeError('Unfortunately something went wrong')


if __name__ == '__main__':
    app.run(host='0.0.0.0', port=5001, debug=True)
2.3.1 Testing our API
After building our Docker images with docker-compose build and executing our Docker containers with docker-compose up we can check our running containers with
$ docker container ps
We can now see all our running services. For testing purposes of the API one can run:
$ python3 test_api.py`
Here is test_api.py with the request:
import requests

# Dictionary with sku
data = {
    "sku": "SLFI54432219010837"
}

# Address
ip_address = 'http://0.0.0.0:5001/related_others_liked'

r = requests.post(ip_address, json=data)

print(r.text)
Additionally, one could e.g. test the API with Postman as well.
3. Outlook & Improvements
The full code of this example can be found on Github. As of now I would think of the following improvements:
- Pack our data processing & modelling classes into a Machine Learning Pipeline like e.g a sklearn pipeline. A good example can be found here.
- Extend and improve our python classes for MLFlow model saving, loading and serving
- Load model via MLflow and create an API to serve online predictions for clients
- Create a more sophisticated configuration of our Nginx webserver